In Summer 2023, Salesforce announced that legacy chat would be entering maintenance- only mode, with a full retirement date of February 14th, 2026. With this retirement date on the calendar, our team here at TruSummit Solutions dove headfirst into Salesforce’s replacement for chat — Messaging for In-App and Web. Not only will Messaging for In-App and Web replace all functionality provided by legacy chat, but it also promises to provide more configuration options for Salesforce admins. In this blog post, we’ll walk through the additional features and functionalities of Messaging for In-App and Web, with a focus on preliminary setup, embedded service deployments, routing, pre-chat forms, and messaging components.
Initial Channel Setup and Routing
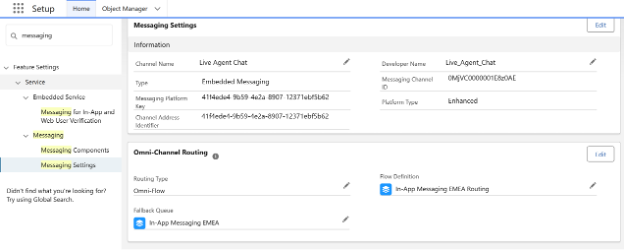
The beginning is a very good place to start: let’s talk initial channel setup and routing. Channels allow admins to create service siloes that route incoming work to the correct place, while also providing the basis for our setup. Some of the customizable settings are routing, automated responses, consent, opt out settings/keywords, and custom parameters. One of the most important components of a successful messaging channel is ensuring that all chats are being routed appropriately. There are two options for routing a messaging session: via omni queues or omni flows. For large scale orgs with complex routing needs, omni flow is the way to go. Imagine a global manufacturing company that needs to route their service requests based on the user’s country of origin. With pre-chat forms and omni flow, customers can first input their country, which will then be used in the routing flow to assign the service request to the correct place. With all of the functionality of omni channel routing plus the flexibility of flow, admins can also incorporate a fallback queue so that if the omni flow fails for any reason, requests will continue to be routed.

Automated Responses
Automated responses are an essential element of any fluid messaging session. There are four automated responses that can be setup for in-app messaging: conversation acknowledgement, start conversation, end conversation, and inactive conversation. To take advantage of automated responses, you first need to create a messaging component then associate it with one of the automated responses. When the trigger for the automated response is met — such as the end of the chat — the messaging component, or auto response, will be sent.

Consent Types
Messaging for In-App and Web offers three different consent types that can be utilized: Implied consent, explicit opt-in, and double opt-in. Implied consent means the customer is consenting when they send a message to the channel, whereas explicit opt-in and ∫ require the customer to send certain keywords to signal their consent to engage with the chat.
Custom Parameters
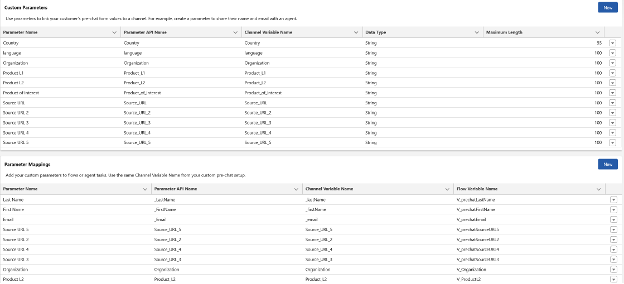
The final piece of initial setup under channel settings is custom parameters. In the simplest of terms, custom parameters are the custom fields for messaging sessions. Once created, custom parameters are mapped to flow variables so that any data captured in a pre-chat form is usable in the routing flow and in any records that may need to be created. We’ll touch on custom parameters and pre-chat forms more when we discuss embedded service deployments.

Embedded Service Deployments
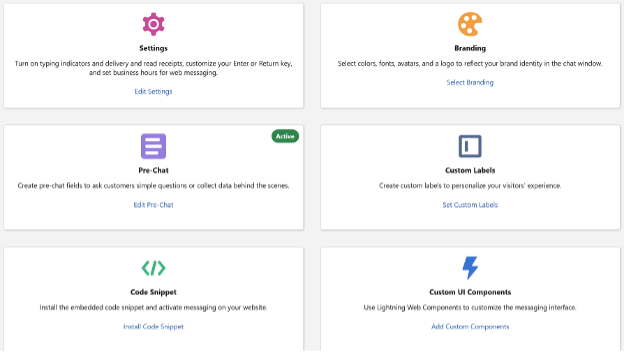
Embedded service deployments have two critical functions: first, it allows for messaging to be exposed and utilized on exterior websites or Experience Cloud sites; second, it provides additional customization options for admins. Within the setup for embedded service deployments, there are options for user interface customization including branding and custom UI components, as well as functional customization options including pre-chat forms, custom labels, and overall settings. The customization options for branding and the custom UI components, are huge updates for live agent messaging; although Salesforce’s previous chat was able to be customized too, admins did not have the declarative resources to do so and instead had to utilize CSS, HTML, or JavaScript.

Within the embedded service deployment, admins have the opportunity to setup custom parameters to be used in a pre-chat form. Standard paramaters that can be setup for the pre-chat form include first name, last name, and email. For any other fields that you wish to include in the pre-chat form, a custom parameter must first be created, then added to the form. Customizing the pre-chat form is essential and will not only allow your support users to have a better understanding of the customer’s request before they get into the actual chat, but also can ensure more complete record creation and proper routing.
With the shift to In-App messaging well underway at this point, users will continue to find more ways to customize this new feature to best fit their individual use cases. As a consultant/admin it’s exciting to see Salesforce continue to push out improved products, and I’m looking forward to all of the success stories customers have thanks to In-App Messaging.
Need help leveraging the latest Salesforce features and functionalities including Messaging for In-App and Web? Our team is here for you! You know where to find TruSummit Solutions.
Featured Articles
Build Your Manufacturing Digital Transformation Roadmap — Starting With CRM
Summary Manufacturing operations leaders are at a crossroads. Budget planning conversations are happening now. The question isn’t whether digital transformation…
Salesforce Manufacturing Cloud vs Sales Cloud: What Is Right for You?
Mid-market manufacturers are not choosing between two separate CRMs. You are deciding whether your business needs manufacturing-specific capabilities layered on…
Why You’re Blind Without Pipeline Visibility And How to Fix It with Salesforce
TL;DR You scheduled production for 10,000 units last month based on your best available forecast. You ran overtime shifts, paid…